Backpacking Tips and Tricks
- By Katie S
- Jun 21, 2023
- 0 Comments

There is something uniquely freeing about backpacking and the way it can make you feel completely disconnected from your everyday life, yet entirely grounded in nature. Literally shouldering the weight of everything you need to survive and stepping away from your life’s comforts is humbling.
While I’ve become all too comfortable with the joys of car camping with little kids and filling our truck to the brim with air mattresses, games, camp chairs, an ungodly huge tent, etc… I decided it was time to pare it all down and get back to the basics with a weekend in the backcountry.
Looking to maximize my weekend away, I decided I’d see if I could find an organized trip for backpacking and fly fishing. It turns out, there’s a group for that! Uncharted Outdoorswomen had a guided backpacking and flyfishing weekend trip coming up. A chance to check out a new fishing spot, meet friends who like to fish, and dust off my backpacking gear – it was win all around. I signed up that day.
So, without further ado, here are ten tips from my preparations for this trip (and a few from past excursions):
1. Make a plan, communicate your plan, stick to your plan
Whether heading into the backcountry solo or with a friend, it’s important to map out your trip ahead of time and communicate your plan to a point person at home who knows when you’re leaving, where you’re going (and by what route), and when you are coming back (within a reasonable window). Then it’s your responsibility to stick to that plan and communicate when you’re back in civilization. Keep it simple to keep it safe. And if you have a GPS communicator, all the better for quickly pinging help in case of emergency.
2. There’s no lightweight substitute for water
A general rule of thumb for hiking and backpacking is to bring one liter of water for every two hours (or 6 miles) of hiking. With backpacking, you also need to account for cooking needs (Are you making a freeze dried meal that needs 1-2 cups? Are you going to drink coffee in the morning? Do you need a little to brush your teeth?) If you’re not bringing a water filter, you’ll need to account for every ounce, and then add an extra half liter for what you’ve forgotten. For this trip, I brought 2 liters in a bladder, then brought a separate one liter water bottle that I filled with an electrolyte supplement to help with the adjustment to being at altitude. I used that up in the first 24 hours. Knowing that we were camping alongside a river, I also brought my water filter so I could refill both water containers as needed. Unless you’re in a life-or-death situation, never drink unfiltered water in the wild.
3. Weight is important, so is comfort
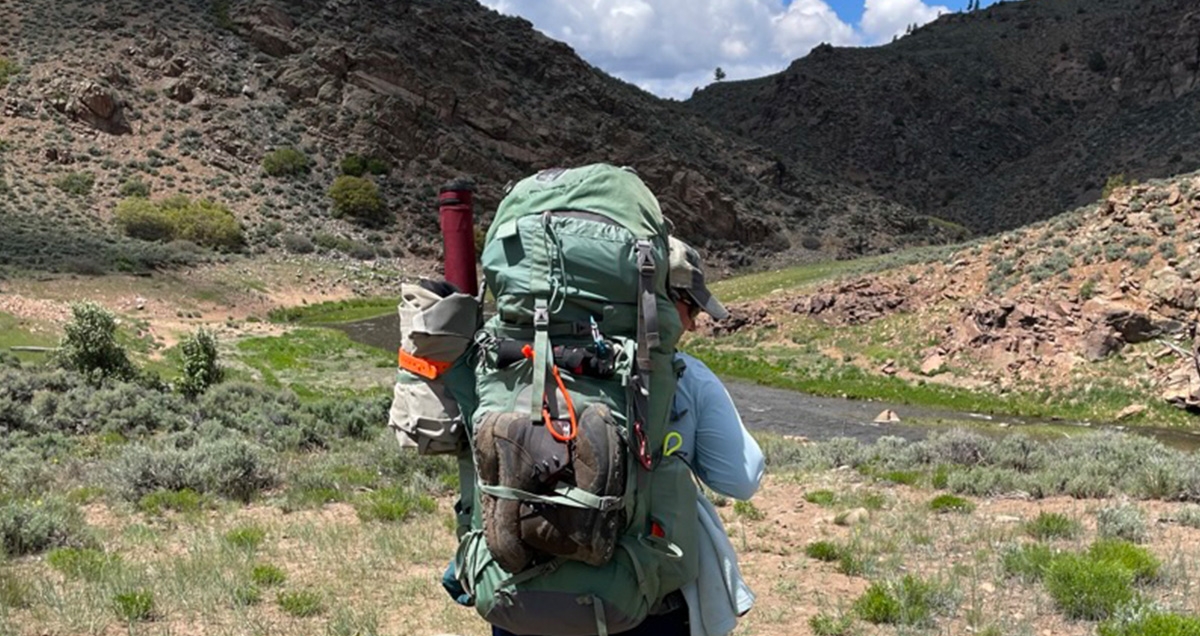
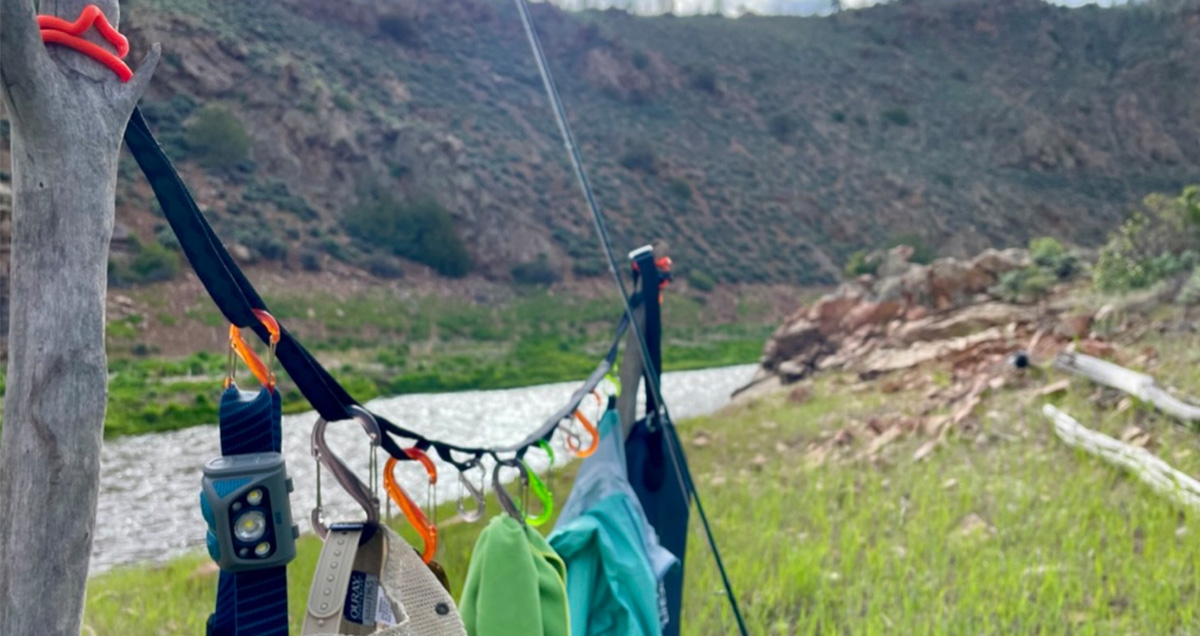
It is important to be realistic and plan for a pack weight that you’re physically capable of carrying. But, if you are generally in decent shape and have chosen a route that’s reasonable for your fitness level, you don’t have to go crazy. There are plenty of ultralight experts out there who will have you cutting off toothbrush handles and flipping underwear inside out to save ounces. You do you, but I will shoulder the extra pound or two to ensure a warm night’s sleep, a little hygiene, and something light for entertainment like a deck of cards. For this trip, I also brought along my GearLine Organization System. This is a comfort item I’ve gotten used to with car camping, but it’s also insanely useful when backpacking. You can strap extra items on your pack with it while you’re hiking, but once camp is set up, that’s when it really shines. Once you’ve emptied your pack, everything just kind of explodes. Enter, the GearLine. We used it all weekend to dry out wet gear, be a rack for our rods, and generally organize all the little items like hats, sunglasses, headlamps, towels, etc…
5. Plan your pack

(See below for a complete list of my pack contents.) Do not wait until the night before your trip to pack. You’re going to want to lay everything out at least a day or two ahead of time, ensure your gear is in good shape (don’t forget to take your tent out, did you dry it thoroughly after your last trip? Are your poles and stakes back in the bag?) and determine if you need to make any last-minute trips to your local outdoor store. If you haven’t worn your boots in a while, go for a walk around the neighborhood to soften them up and make sure they still fit how you remember (bonus points if you go for a walk around the neighborhood with your fully loaded pack on).
Plan out meals and snacks to a T. You’ll want to account for burning extra calories on the trail, too. Good news: the freeze-dried options have gotten way more varied and tasty over the years, and they make a great lightweight meal option. For snacks and lunches, I’m like a five year-old who’s been set free in a gas station with her mom’s credit card. I loaded up on pop tarts, gummy bears, M&M’s, and almonds. To each their own. I like to organize my breakfast and dinners into a large RunOff Waterproof Packing Cube along with my JetBoil, lighter, and camp dishes. Those can go in my pack since I won’t need them till I get to camp. Then I put my snacks and lunch items in a smaller RunOff in my pack lid for easy access on the trail. The bags waterproof the food but are also airtight to minimize food smells for hungry locals to pick up on.
6. Plan your Straps & Clips
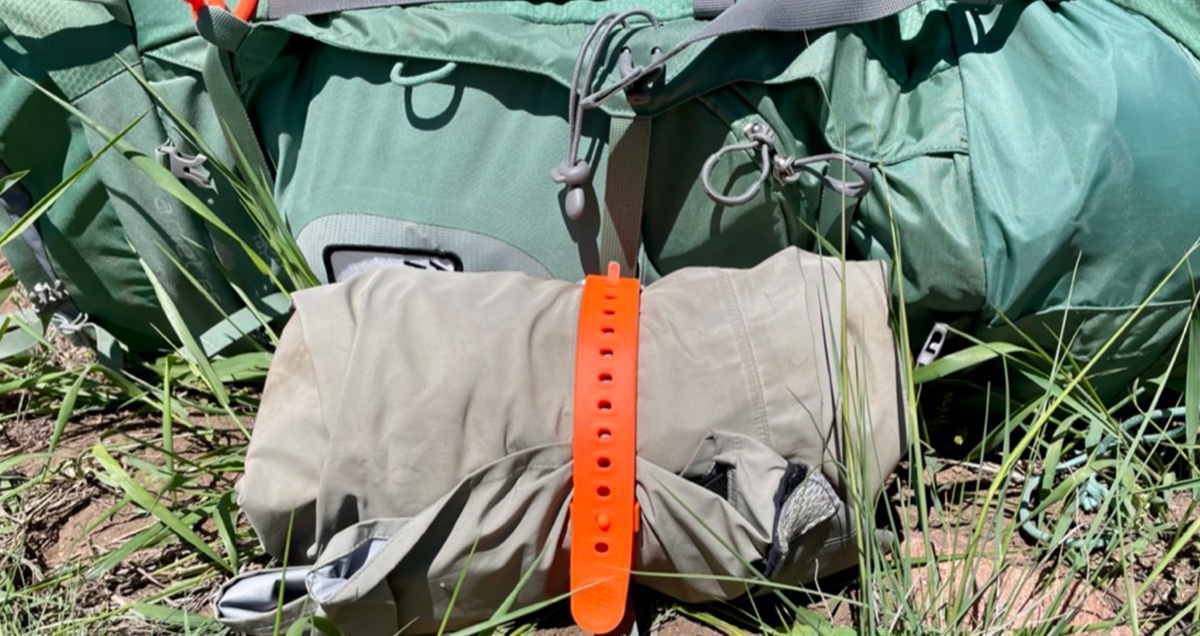
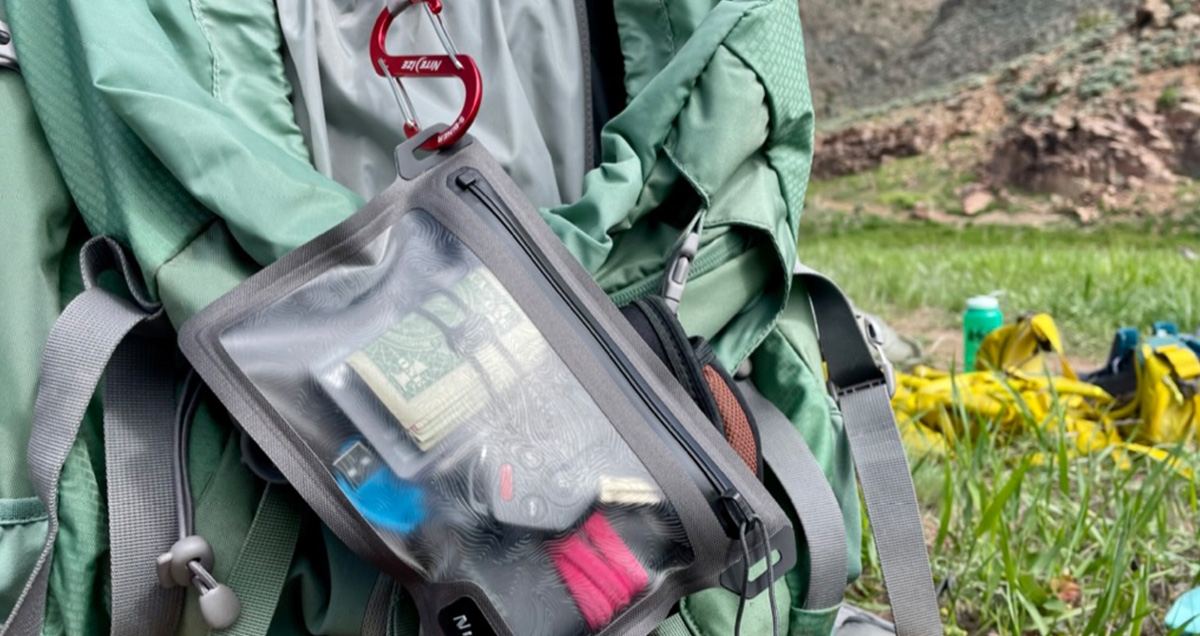
Next and most importantly, make sure it all fits in your pack. When you get your pack loaded and find yourself with a handful of items that aren’t in it, that’s when Gear Ties and GearPro Utility Straps really shine. Since I needed everything I normally would for backpacking plus my fly fishing gear for this trip, I had to plan for a hefty overflow. I used my Gear Ties to secure wading boots on the front of my pack, and my rod into one of the side water bottle holders. (Pro tip #1: Never trust your pack’s water bottle sleeve alone, secure the bottle in place with an S-Biner or Gear Tie – a full water bottle will quickly become a projectile on a steep hill that can take out your fellow hikers below). Next, I wrapped my waders in a tight roll and cinched them down with a utility strap. (Pro tip #2: waders are waterproof, you can wrap clothes or small items up in them for extra waterproofed packing space.) I also used a small RunOff Waterproof Pocket for my keys and wallet, then locked it into the interior of my pack with a locking S-Biner so I wouldn’t have to worry about it getting pulled out unintentionally along the way.
7. Keep it light and bright
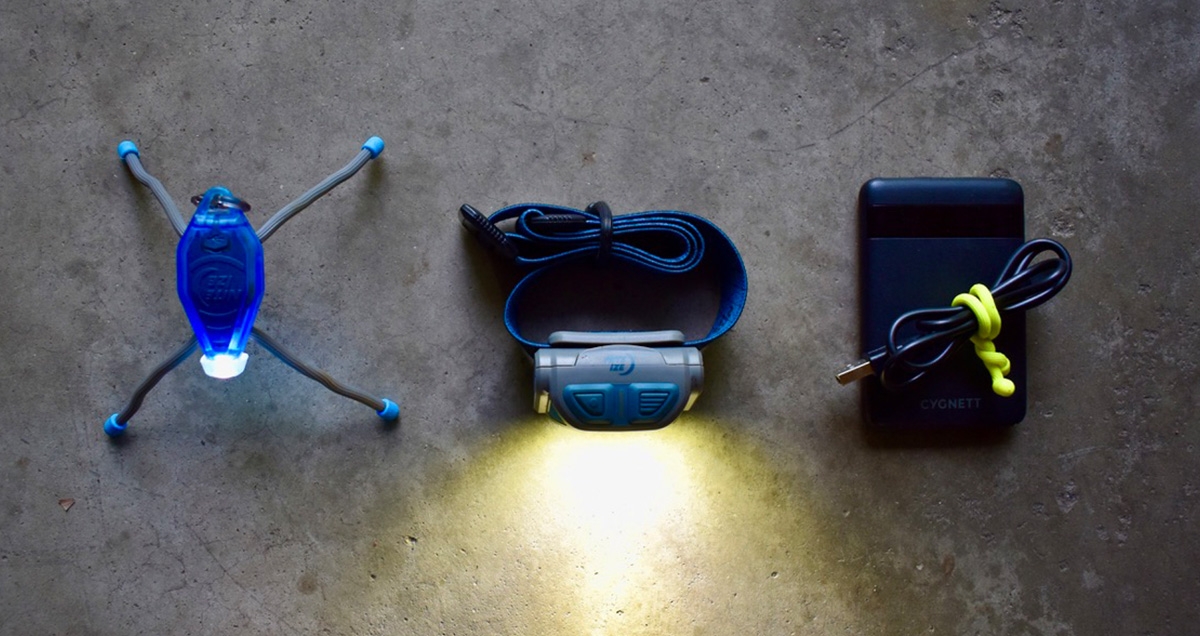
When you’re on the trail with no civilization for miles, you’re going to want to bring reliable lights, but also not be weighed down by carrying a bunch of extra batteries. I usually bring a rechargeable headlamp and an extra small back up light. For this trip I had the opportunity to try out the new Radiant RH2 PowerSwitch Headlamp which worked out perfectly – it’s lightweight, completely waterproof (see tip #10!), ultrabright, and can run off the included rechargeable battery or AAA’s. I also brought along a small charging pack and cords for my phone and lights. For my backup light, I keep a little BugLit wrapped to my shoulder strap for a quick light on the trail. It also detaches and stands on its own as a little utility light for cooking or playing cards.
8. Don’t skip the first aid kit
If you are going to be more than two hours from medical care, bring a decent first aid kit. I like the Adventure Medical Kits Ultralight .5, and then I customize it a bit with my own prescriptions, some extra moleskin and bandages, and a pack of Quikclot in case it really hits the fan.
9. Keep a sharp eye and bring extra Gear Ties
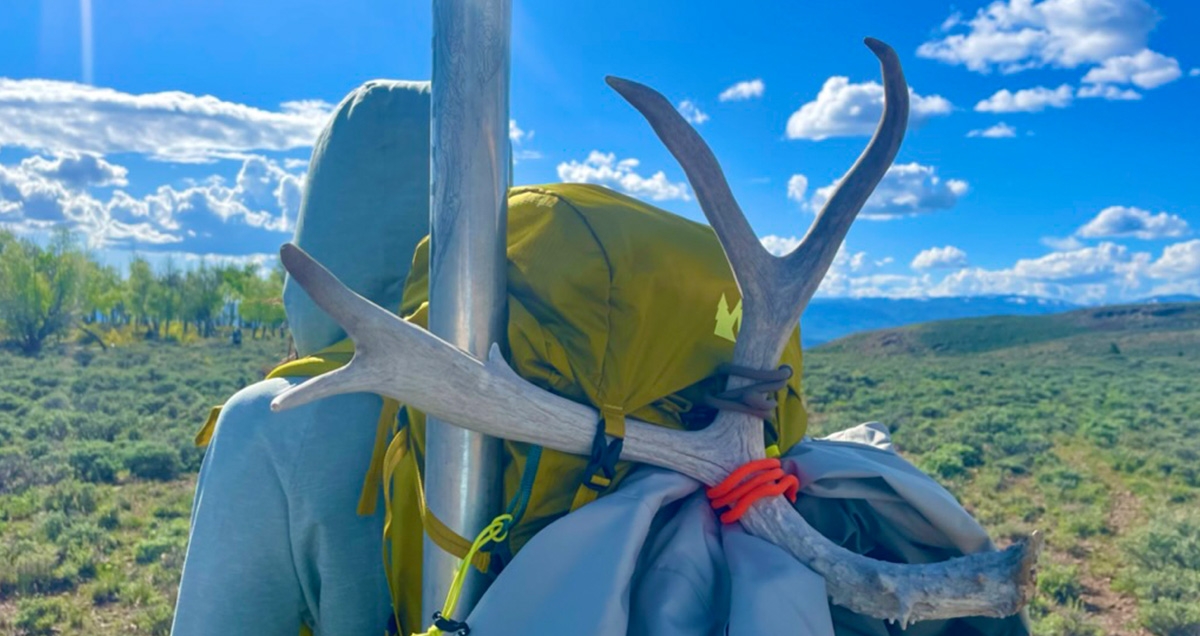
Turns out, there’s more than trout in the high country. With a couple of phenomenal guides to give us some pointers, our hikes out and back became a lot more exciting when we learned we were in the right season to search for antler sheds. Fortunately, I had a few extra Gear Ties to give my new fishing friend when she found this impressive mule deer shed.
10. Waterproof it all

Nothing can ruin a backpacking trip like soggy boots, a wet sleeping bag, and ruined gear. About three days before our trip, the forecast tanked. It looked like it would rain most the first day and scattered showers the next. Rain is discouraging, but I was not distraught. I re-waterproofed my boots and threw in some extra blister care items. I was already planning to use RunOff Waterproof Bags to organize and seal my food, so I threw in a couple more to waterproof my clothes and sleeping bag. I was ready for whatever the Colorado spring weather would throw at us.
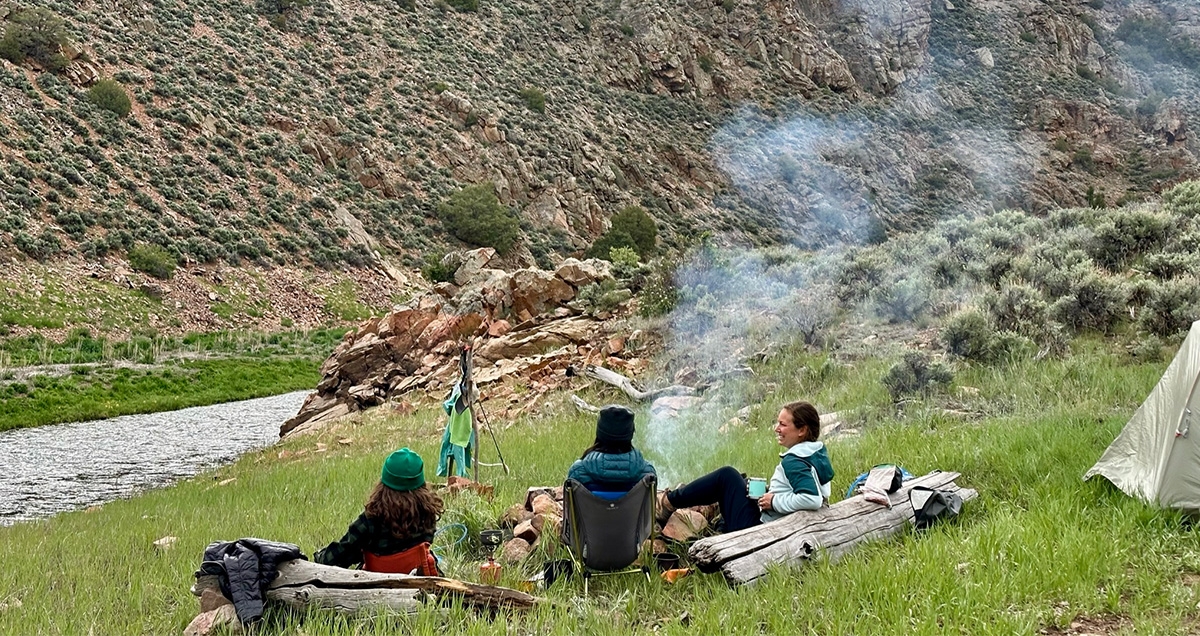
So, how’d it go? It was phenomenal. A pristine weekend with a lot of Rocky Mountain blue skies, a dash of rain, some solid trekking, great new friends, a hearty handful of healthy trout in the net, and not another soul in site the whole time – except for few visits fro m a curious black bear and bunch of other Rocky Mountain wildlife, naturally.
Backpacking Gear List
1. MSR Hubba Hubba Tent
2. REI Women’s 30 Degree Down Sleeping Bag
3. Downmat 9 Inflatable Sleeping Pad
4. Grabber 12 Hour Body Warmers
5. 2 Liter CamelBak Bladder with Plain Water
6. 1 Liter Water Bottle with Electrolyte Mix
7. Katadyn Water Purifier System
8. Nite Ize Radiant RH2 PowerSwitch Headlamp
9. Nite Ize Rechargeable BugLit
10. Nite Ize GearLine Organization System
11. Small Battery Pack and Charging Cords
12. Light My Fire Camp Dishes
13. JetBoil Stove/Pot Combo
14. 100mg Propane
15. Yeti Camp Mug
16. Nite Ize RunOff Waterproof Bags with S-Biners
17. Assorted Gear Ties + GearPro Utility Straps
18. Deck of Cards
19. Bear Spray with S-Biner
Flyfishing Gear List
1. Fishing License
2. Orvis Helios 9’ 5 weight rod and reel
3. Simms Women’s Waders
4. Simms Lightweight Wading Boots
5. Umpqua Small Hip Pack
6. Nippers
7. Forceps
8. Assortment of locally recommended flies
9. Weights
10. Indicators
11. Tippet
12. Floatant